On-premise Deployment using Preconfigured VM
asvin provides a preconfigured virtual machine (OVA file) that includes all the necessary components and software for Risk by Context™. This method is ideal for users who want to get started quickly without manual installation of dependencies.
Prerequisites
Before proceeding with the setup, ensure the following requirements are met:
Hardware Requirements
A 64-bit x86/AMD64 CPU with virtualization support (Intel VT-x or AMD-V).
Minimum 2 GB RAM (4 GB or more recommended).
Minimum 50 GB free disk space.
1.3GHz or faster core speed
Virtualization Support
Make sure virtualization is enabled in BIOS/UEFI.
Warning
Secure Boot may interfere with the proper functioning of VMware or prevent some virtual machines from starting. If you experience issues, consider disabling Secure Boot in your system BIOS/UEFI settings.
Operating System
Compatible with Windows 10/11 or a recent Linux distribution.
Note
You must have administrator privileges to install and run VMware and configure network interfaces if needed.
VMware Workstation / VMware Player
Install VMware Workstation or Fusion.
Ensure that your VMware product supports running .ova files.
Download Files
Ensure you have access to the following files.
asvin rbc virtual machine image (.ova)
- docker images
Portal: asvin-rbc-portal.tar
Backend: asvin-rbc-device-service.tar
Database: asvin-rbc-mongo.tar
Setup Guide: Importing the OVA File into VMware
Follow the steps below to import the provided .ova file into your VMware application.
Note
Install all the required tools and download images as described in Prerequisites setup.
Launch VMware
Open the VMware application:
On Windows/Linux: Open VMware Workstation or VMware Player.
Import the OVA File
From the main menu, select
File→Open.Browse to the location of the .ova file.
Select the .ova file and click
Open.VMware will display an Import Virtual Machine window.
Choose a name and destination folder for the virtual machine.
Click Import to begin the process.
Hint
This may take a few minutes depending on the size of the OVA and the performance of your system.
Power On the VM
Once the import completes:
The VM will appear in your VMware library.
Select the virtual machine and click Power on this virtual machine.
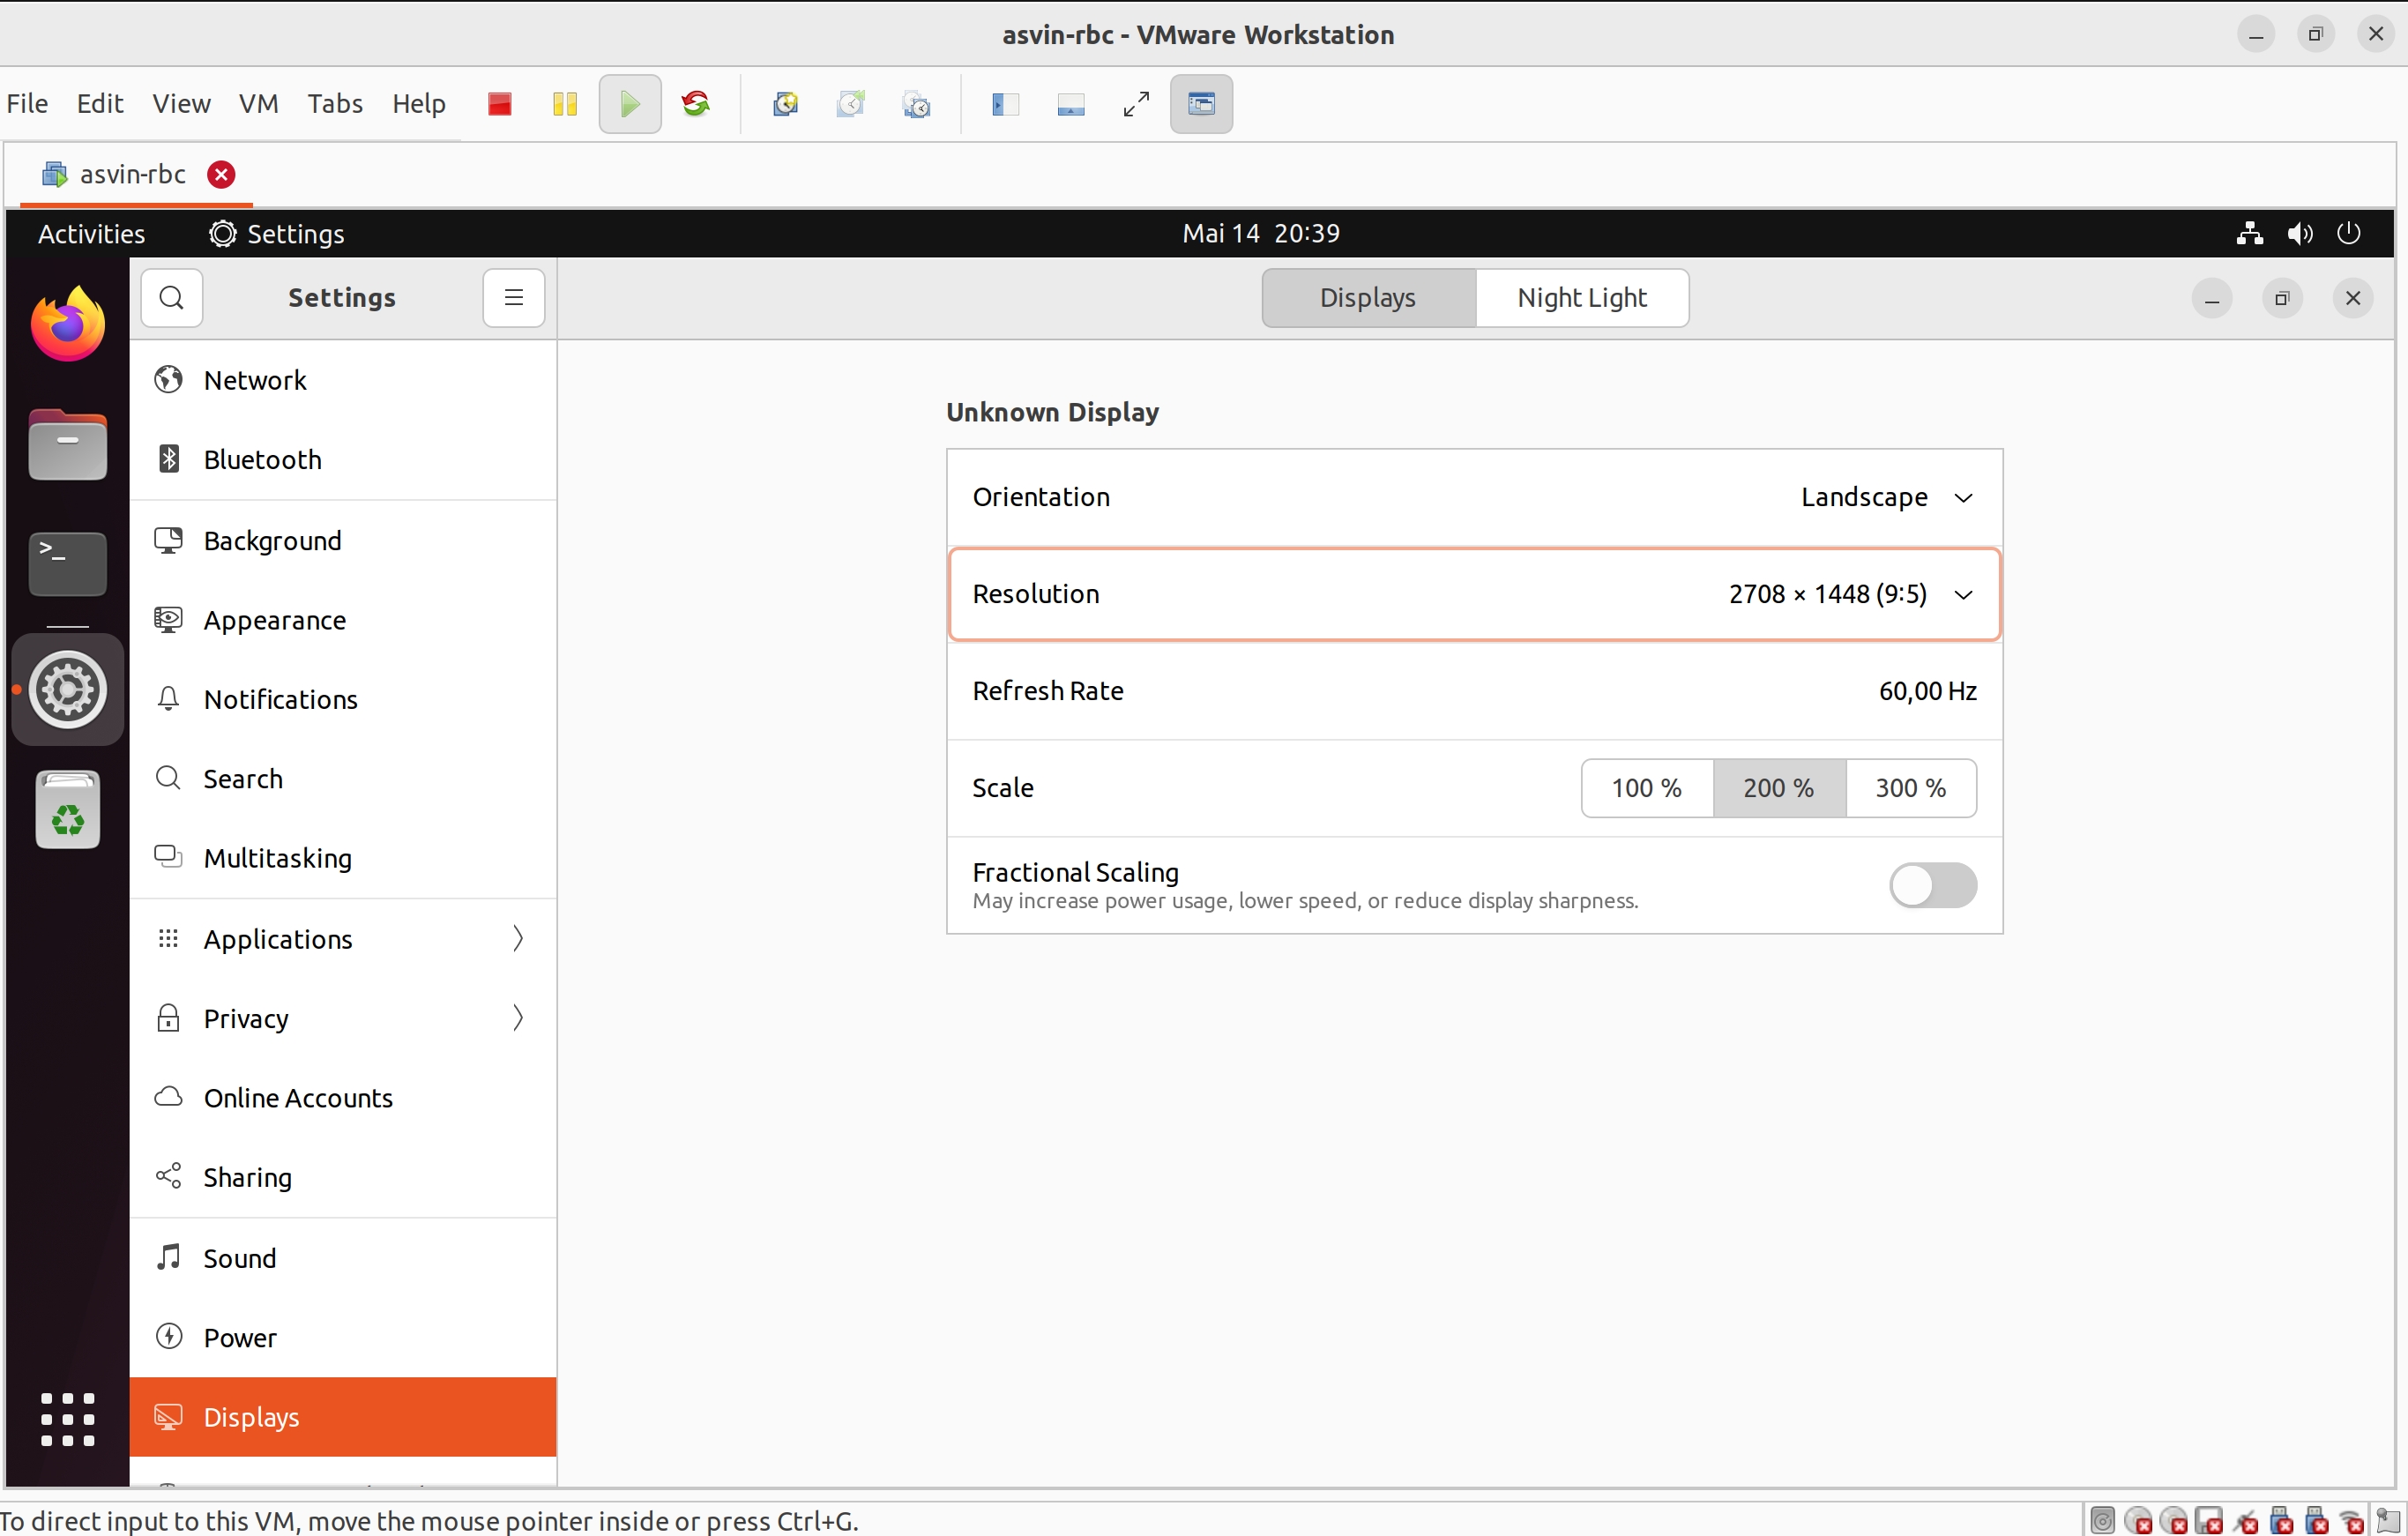
If you experience issues with the display size or resolution in your virtual machine, you can easily fix it by adjusting the settings.
Open
Settingsin the VMGo to: Display
Change Orientation, Resoution, and Scale as required.
Login Information
Please refer to the specific documentation or accompanying README.md if different credentials or setup scripts are provided.
Post-Setup Verification
The virtual machine provided in the .ova file comes with the following software pre-installed and pre-configured:
Docker & Docker Compose
Docker is installed to support containerized applications.
Docker Compose is available to orchestrate multi-container services.
Hint
Installed version of docker is 28.1.1 and docker compose v2.35.1
You can verify the installation and check versions after starting the VM:
To check Docker installation
Open the Terminal in the VM and run
docker --version
You will see output like:
Docker version 28.1.1, build 4eba377
To check Docker Compose
Run the following command in the Terminal.
docker compose version
Hint
docker compose (with a space) is used in recent versions instead of the older docker-compose command.
You will see output like:
Docker Compose version v2.35.1
MongoDB Compass
It provides a user-friendly interface to visualize, query, and manage MongoDB databases. It simplifies database interaction by eliminating the need for manual command-line operations.
Hint
The pre-installed version of the MongoDB Compass is 1.40.4
Check MongoDB Compass
Open MongoDB Compass from the Applications menu.
Verify that the application launches successfully.
OpenSSH Server
OpenSSH Server allows you to securely access and manage your system remotely via SSH (Secure Shell). It enables encrypted communication and remote terminal access over the network.
To check SSH Server installation
Open a Terminal in the VM and run following command.
sudo systemctl status ssh
You will see output like:
● ssh.service - OpenBSD Secure Shell server
  Loaded: loaded (/lib/systemd/system/ssh.service; enabled; vendor preset: enabled)
  Active: active (running) since Wed 2025-05-14 09:23:29 CEST; 5min ago
    Docs: man:sshd(8)
          man:sshd_config(5)
 Process: 892 ExecStartPre=/usr/sbin/sshd -t (code=exited, status=0/SUCCESS)
Main PID: 913 (sshd)
   Tasks: 1 (limit: 4549)
  Memory: 3.0M
     CPU: 21ms
  CGroup: /system.slice/ssh.service
          └─913 "sshd: /usr/sbin/sshd -D [listener] 0 of 10-100 startups"
Importing Docker Images into the VM
You are provided with pre-built Docker images in a .tar format, you can load them into Docker inside the virtual machine using the docker load command.
Transfer the Docker Image Files
Ensure the image files mentioned in Prerequisites section are available inside the VM. You can:
Drag and drop the file into the VM (if supported by VMware).
Use shared folders to transfer from host to VM.
Select your virtual machine in the VMWare library and right click on it.
Go to
Settings→Options→Shared FoldersSelect
Always enabledand click on+ Add..In the pop-up enter the name and browser the folder on host machine that you want to share.

Use scp
Power on the VM and find the ip address. You can use
ifconfigcommand in the Terminal. It will show all network interfaces on the VM. Find the ip address of the wired-connection interface. It should have output like the following.ens33: flags=4163<UP,BROADCAST,RUNNING,MULTICAST> mtu 1500 inet 192.168.191.132 netmask 255.255.255.0 broadcast 192.168.191.255 inet6 fe80::1f5c:9967:9286:455b prefixlen 64 scopeid 0x20<link> ether 00:0c:29:06:b8:04 txqueuelen 1000 (Ethernet) RX packets 420 bytes 406105 (406.1 KB) RX errors 0 dropped 0 overruns 0 frame 0 TX packets 357 bytes 50224 (50.2 KB) TX errors 0 dropped 0 overruns 0 carrier 0 collisions 0Open a Terminal in your host machine and run following command.
scp -o PubkeyAuthentication=no <path-of-file> otadmin@ip-address:<path-where-to-copy>For an example if you want to copy
asvin-rbc-portal.tarfile to ~/rbc folder in the VM then use following command.scp -o PubkeyAuthentication=no asvin-rbc-portal.tar otadmin@192.168.191.132:rbc/Use USB devices as alternatives.
Load the Image into Docker
Once the .tar files are accessible inside the VM, open a terminal and run
./rbc load
Note
If you encounter any errors while using the ./rbc, please refer to the Common Errors section for troubleshooting.
Note
This command uses docker load command to load all RBC images. You can load them manually using the following commands.
docker load -i asvin-rbc-portal.tar
docker load -i asvin-rbc-device-service.tar
docker load -i asvin-rbc-mongo.tar
It will give the output as shown below.
f4111324080c: Loading layer [==================================================>]   7.35MB/7.35MB
5fa2288e0d6e: Loading layer [==================================================>]  5.316MB/5.316MB
419b89bbfa3b: Loading layer [==================================================>]  3.584kB/3.584kB
08761a690f84: Loading layer [==================================================>]  4.608kB/4.608kB
439be94dd989: Loading layer [==================================================>]  3.584kB/3.584kB
66afb7c3e6d1: Loading layer [==================================================>]  7.168kB/7.168kB
7388ed75460c: Loading layer [==================================================>]  30.21MB/30.21MB
98681f27b172: Loading layer [==================================================>]  3.584kB/3.584kB
521f489e8210: Loading layer [==================================================>]  7.372MB/7.372MB
Loaded image: asvin-rbc-portal:latest
Verify the Images are Loaded
Check the list of available Docker images:
docker images
You should see the newly imported image listed as shown below:
REPOSITORY                 TAG       IMAGE ID       CREATED         SIZE
asvin-rbc-portal           latest    d9d847a29288   2 weeks ago     48.4MB
asvin-rbc-device-service   latest    58f9516cda65   2 weeks ago     861MB
mongo                      6.0.6     7e32c3979b02   22 months ago   653MB
Configuring Ports, Environment Variables and Volumes
In the docker-compose.yml file, you can easily configure port mappings, environment variables and volumes for the services.
Port Configuration
Use the ports field to map a port inside the container to a port on your virtual machine. The format is <vm_port>:<container_port>. By default, the services run on the following ports.
Portal : 8080
Device Service: 5001
MongoDB: 27001
Environment Variable Configuration
Use the environment field to set environment variables inside the container. The environments variables are used to configure the services. The configuration for various services is follows.
Note
Change the default username and password for MongoDB root user before deploying the application.
MongoDB
MONGO_INITDB_ROOT_USERNAME: Specifies the username for the MongoDB root user.
MONGO_INITDB_ROOT_PASSWORD:Specifies the password for the MongoDB root user.
Device Service
MongoConnection__ConnectionString: Defines the full connection string used by the application to connect to the MongoDB server. It is defined in specific format,mongodb://username:passwrod@mongodb-host:mongodb-port/?authSource=admin
MongoConnection__Database: Specifies the name of the MongoDB database that the application will use.
JsonWebTokenKeys__IssuerSigningKey: Provides the secret key used to sign and validate JSON Web Tokens (JWTs) for authentication and authorization.
Persistent volume configuration
To ensure that MongoDB data remains persistent across container restarts, a Docker volume is configured for storage. This prevents data loss when containers are recreated, updated, or stopped.
The volume is defined under the volumes section of the docker-compose.yml file. By default, the database files are stored inside a local folder named rbc-data, located in the same directory as the Compose file.
You can customize the storage location by modifying the following line in the Compose file:
volumes:
      - ./rbc-data/context:/data/db
Here, the path before the character ‘:’, in this case ./rbc-data/context refers to the host machine directory, and /data/db is the internal path inside the MongoDB container where the data is stored.
Starting the Application with Docker Compose
The application is containerized and orchestrated using Docker Compose, which manages the frontend, backend, and database services.
Start the Application
Use the following command to start all services:
./rbc up
Note
If you encounter any errors while using the ./rbc, please refer to the Common Errors section for troubleshooting.
The command will produce output similar to the following example:
[+] Running 4/4
 ✔ Network asvin-rbc                         Created
 ✔ Container rbc-asvin-rbc-portal-1          Started
 ✔ Container rbc-asvin-rbc-mongo-1           Started
 ✔ Container rbc-asvin-rbc-device-service-1  Started
- Docker Compose will automatically start containers for:
Portal
Device service
MongoDB database
Verify Running Containers
Check the status of all services:
./rbc ps
Note
If you encounter any errors while using the ./rbc, please refer to the Common Errors section for troubleshooting.
You should see the containers for portal, devicee service, and database marked as Up. Executing the command yields output resembling the example below:
[+] Running 4/4
 ✔ Container rbc-asvin-rbc-mongo-1           Removed
 ✔ Container rbc-asvin-rbc-portal-1          Removed
 ✔ Container rbc-asvin-rbc-device-service-1  Removed
 ✔ Network asvin-rbc                         Removed
Access the Portal
Open a browser inside the VM or from the host (if port forwarding is enabled) and go to: http://localhost:8080
Note
You can change the port in your docker-compose.yml.
Stopping the Application
To stop all RBC containers:
using RBC CLI
./rbc downNote
If you encounter any errors while using the
./rbc, please refer to the Common Errors section for troubleshooting.using docker CLI
docker compose down
This will stop and clean up all running containers. The output would be similar as below:
[+] Running 4/4
 ✔ Container rbc-asvin-rbc-mongo-1           Removed
 ✔ Container rbc-asvin-rbc-portal-1          Removed
 ✔ Container rbc-asvin-rbc-device-service-1  Removed
 ✔ Network asvin-rbc                         Removed
Connecting to MongoDB Using MongoDB Compass
MongoDB Compass is a graphical interface that allows you to easily connect to your database, explore collections, and run queries without using the command line. Follow the steps below to connect to your MongoDB instance.
Open MongoDB Compass
Launch the MongoDB Compass application.
Click on
+Add new connectionEnter Connection Details
In the New Connection window, fill in the connection string used in
docker-compose.ymlto URI in formatmongodb://username:password@mongodb-host:mongodb-port/?authSource=admin
Note
Replace the username, password, host, and port accordingly.
Enter the connection name
Connect and Explore
Click Connect to establish the connection.
Once connected, you will see a list of databases on the left sidebar.
Select your database (e.g.,
asvin_rbc_local) to view its collections and documents.
Upgrade RBC Application
Copy updated docker images to the VM.
Note
Ensure that the file names strictly follow the specified naming convention:
asvin-rbc-portal.tarasvin-rbc-device-service.tarasvin-rbc-mongo.tar
These exact file names are required for processing correctly. Avoid any deviations in spelling, case, or file extension.
Upgrade the RBC containers.
./rbc upgradeNote
If you encounter any errors while using the
./rbc, please refer to the Common Errors section for troubleshooting.Congratulations, you have successfully upgraded the RBC applications. Under the hood, the command loads the docker images, removes the containers, creates and starts them again.
If you are interested in doing it manually, you can follow the guidelines below.
Load the image. For example, if you have received new version of RBC Portal image
asvin-rbc-portal.tar, you can import it using the following command in Terminal.using RBC CLI
./rbc load portal
using docker CLI
docker load -i asvin-rbc-portal.tar
Once the docker images are loaded you can restart them:
using RBC CLI
./rbc restartusing docker CLI
docker compose down
docker compose up -d
Data Import
The RBC Portal allows you to manually import data for Locations, Segments, and Devices using CSV files. To begin, navigate to the Imports page from the sidebar menu.
Supported Data Types
Location
Segment
Device
These data types follow a hierarchical structure: Location → Segment → Device
Warning
You must import data in the correct order. Attempting to import a lower-level entity (e.g., a Device) before its parent (e.g., its Segment or Location) will result in an error.
Note
Ensure your CSV files are formatted correctly according to the provided templates for each type.
Location Import
CSV Requirements:
Must include a
NameandCoordinates.
Warning
The coordinates for the location must be provided in [longitude, latitude] format. Using any other order may lead to incorrect geospatial processing.
Segment Import
CSV Requirements:
Must include a
Network,NetworkGroup,NetworkAddress,NetworkLocationandNetworkLocationId`.This must be imported after Locations.
Device Import
CSV Requirements:
Must include a unique
DeviceId,DeviceRef.This must be imported after Locations and Segments